
Tony Martinez
Each month I will describe sights of interest in the night skies of South Carolina. These sights will be broken down into three sections; what you can see with the naked eye, with binoculars, and with a small telescope. The best time to view the night sky is at and around the times when the Moon is not visible, what is known as a New Moon; which will occur this month on September 18th. For September, your best viewing nights will be from September 12th through September 23rd. The Star chart below is set for Florence, SC on September 15th at 10 pm.

Jupiter: Although Jupiter was in opposition last month, this month should be a better month for Jupiter watching. First, Jupiter will rise earlier in the evening. Through most of the month, it will be in a good viewing position by 9 pm, and even better at 10 pm. Second, hopefully the humidity will lessen, allowing for clearer viewing. We always see the beautiful large images of Jupiter as I posted last month, but what can you expect to see through your own telescopes? The images below show two good views of Jupiter through amateur scopes. Remember, if you can’t see the cloud bands, it may not be a problem with your telescope, but it may just be a bad viewing night; keep trying.

Telescope Finding Scopes: I have mentioned finding scopes briefly in previous columns, but allow me to expand on this subject.
Many of the readers of this column most likely have a telescope. All of your scopes have to be aimed at your target of choice. New amateur astronomers have to take the time and have patience to learn the night sky. Eventually you will be able to point to a spot in the sky and know that that is where M27 is, or the Hercules Cluster, or the Coathanger asterism, etc. However, no matter how good you become, you still have to be able to aim your telescope at your target. This should be a simple matter. Every telescope comes equipped with some type of “finding scope.” Traditionally, these finding scopes attach to the side of your scope, and are just small low power telescopes, usually 6 to 8 power, and they almost always have crosshairs in the lens to aid in locking the telescope on your target. Now the “problems”: These small finding scopes usually give an upside down and reversed image, which may or may not match the image of your actual telescope. In addition, and probably the most frustrating is that in general, finding scopes give too small an angle of view. Note: In a small box, in my attic is every finding scope that came with every telescope I have purchased.
So how do you aim your scopes? There are two very effective aiming devices. The simplest and cheapest is a Red Dot Finder. The better and more expensive device is a scope mounted Green Laser.
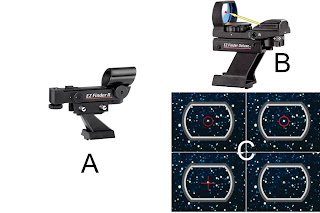
First the red dot finder. The red dot finder does not use a red laser. It uses a red LED light. The LED is somewhat hidden in the back, and a reflection of the light is seen on a plain glass section in the front. As you look through the finder, you will see the red dot on the glass surface. You then simply overlay this red dot on the dark sky, and place it on your target of choice. The initial setup is best done in the daylight. Mount the red dot on your scope, aim your scope at a simple distant target, such as a street light or mailbox, etc and use the vertical and horizontal adjusting screws in the red dot to overlay the dot on the object seen in the center of your scope’s field of view. The red dot finder A below is about $38, and finder B about $65. Finder B has a larger field of view (not really necessary), and also has four different red shapes to overlay on the sky, which is a nice touch. (C below) There is another plus for the red dot finders. Usually, you don’t know exactly where you target is, so you place the red dot in the area where the target should be, and using charts, you search for the target. Once you locate the object in your scope, look through the red dot finder with both eyes open. You will now know the exact location of the object in the sky with the naked eye; this cannot be done with a traditional finder.
Second, the Green Laser Finder. The green laser has been a great tool for teaching astronomy. However, attaching a green laser to your telescope is also a great way to aim your scope. You can see exactly where your scope is pointing as you stand next to your scope and move it around; we use a green laser on our Dobsonian telescope. Allow me to describe a “trick” I use with the green laser. To locate a deep sky object such as the Dumb Bell nebula (M27), you point your scope mounted laser near the place in he sky where it is located based on your star charts, and turn it off. Next, use a pair of 7 or 10 power binoculars to find the object, and while holding the binoculars on the target, turn the laser finder back on and move the laser until you see the laser through the binoculars, “touch” M27. Your scope is now on your target. Note: This method is much easier to do with two people.
The complete laser and mount shown on the left below sells for $120.

Naked Eye Sights: Enjoy Jupiter, and wait for someone to ask you, “What is that bright star?”
Binocular Sights (7 to 10 power): Jupiter’s moons.
Telescope Sights (60-100mm): This month and the next may give you your best views of Jupiter. Look for the cloud bands.
See you next month!


